
Consul Mesh Gateway for Hybrid Cloud - K8S x VMs(BMs)
Consul을 사용하여 K8S와 VM 환경의 두 Consul로 구성된 데이터센터의 서비스를 연계하는 방법을 설명합니다.
| [ Consul | Features ] |
구성 개요
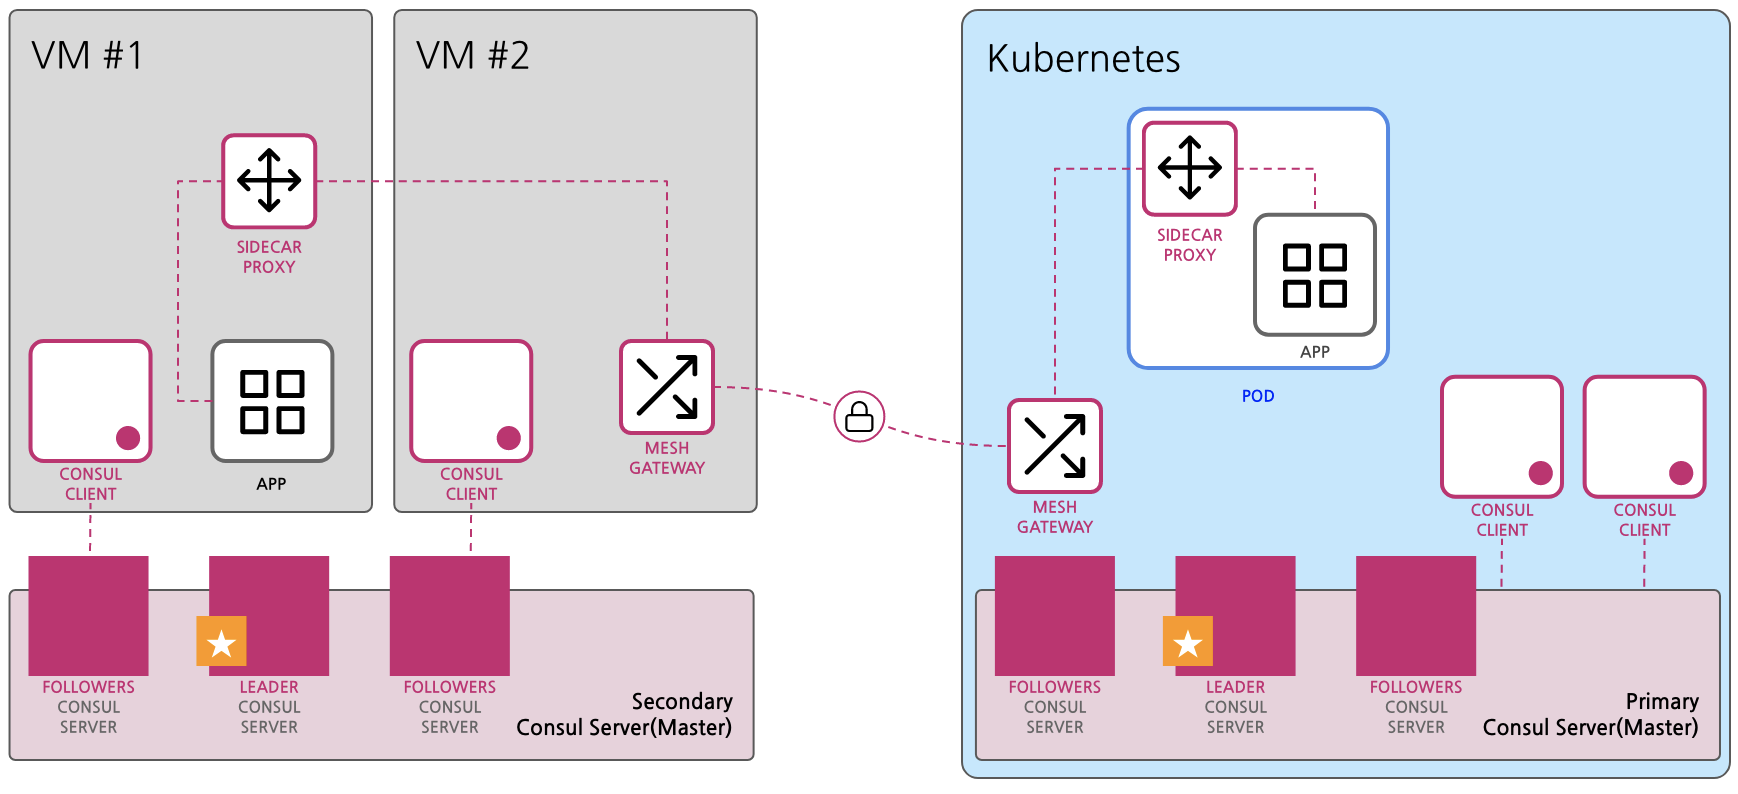
네트워크 영역이 분리되어있는 두 환경의 애플리케이션 서비스들을 Service Mesh로 구성하는 방법을 알아 봅니다. 이번 구성 예에서는 Kubernetes와 Baremetal(BM)이나 VirtualMachine(VM)에 Consul Cluster(Datacenter)를 구성하고 각 환경의 애플리케이션 서비스를 Mesh Gateway로 연계합니다.
Mesh Gateway를 사용하면 서로다른 클러스터간에 mTLS 환경의 통신과 서비스 간의 트래픽 통로를 단일화 하여 구성할 수 있습니다. 또한 mTLS내의 데이터가 Gateway에서 해동되지 않기 때문에 두 클러스터간 안전하게 데이터를 송수신 합니다.
Consul의 각 Cluster는 Datacenter라는 명칭으로 구분됩니다. 이번 구성에서는 Kubernetes의 Consul Datacenter가 Primary의 역할을 합니다.
- 각 Application을 위한 Sidecar를 구성합니다.
- Mesh Gateway를 구성하기 위해서는 모든 Sidecars는 Envoy 로 구성되어야 합니다.
- Mesh Gateway를 구성하기 위해서는 Sidecar와 Consul이 TLS로 통신해야 합니다.
Port 구성 참고
Port 구성에 대한 문서는 다음을 참고합니다. https://www.consul.io/docs/install/ports
| Use | Default Ports | CLI |
|---|---|---|
| DNS: The DNS server (TCP and UDP) | 8600 | -dns-port |
| HTTP: The HTTP API (TCP Only) | 8500 | -http-port |
| HTTPS: The HTTPs API | disabled (8501)* | -https-port |
| gRPC: The gRPC API | disabled (8502)* | -grpc-port |
| LAN Serf: The Serf LAN port (TCP and UDP) | 8301 | -serf-lan-port |
| Wan Serf: The Serf WAN port (TCP and UDP) | 8302 | -sert-wan-port |
| server: Server RPC address (TCP Only) | 8300 | -server-port |
| Sidecar Proxy Min: Sidecar 서비스 등록에 사용되는 범위의 최소 포트 | 21000 | Configration file |
| Sidecar Proxy Max: Sidecar 서비스 등록에 사용되는 범위의 최대 포트 | 21255 | Configration file |
Federation을 위한 포트로는
- Consul Server & Agent
- 8301 : Gassip 프로토콜로 서로간의 상태를 확인하는데 사용됩니다.
- Consul Server
- 8500 : Server의 API통신을 위한 포트입니다.
- 8501 : Mesh Gateway와 TLS로 통신합니다.
- 8300 : Agent가 서버와의 RPC통신을 합니다.
- 8600 : Consul DNS를 위해 사용됩니다.
- Consul Agent
- 21000~21255 : Sidecar 서비스가 할당받는 포트 범위 입니다.
각 포트 구성설정 가이드는 다음과 같습니다.
ports {
  dns = 8600
  http = 8500
  https = -1
  grpc = -1
  serf_lan = 8301
  serf_wan = 8302
  server = 8300
  sidecar_min_port = 21000
  sidecar_max_port = 21255
  expose_min_port = 21500
  expose_max_port = 21755
}
0. 사전 준비 사항
-
Kubernetes가 설치되어있어야 하며, 작업을 수행할 환경에서 접속 가능한 상태여야 합니다.
- Helm3 혹은 Helm2를 설치합니다.
- Installing Helm : https://helm.sh/docs/intro/install/
- Consul 을 실행할 수 있도록 준비합니다.
- Install Consul : https://www.consul.io/docs/install
-
2021년 6월 26일 기준으로 구성한 버전은 다음과 같습니다.
-
consul helm (k8s)
$ helm show chart hashicorp/consul annotations: artifacthub.io/images: | - name: consul image: hashicorp/consul:1.10.0 - name: consul-k8s image: hashicorp/consul-k8s:0.26.0 - name: envoy image: envoyproxy/envoy-alpine:v1.18.3 artifacthub.io/license: MPL-2.0 artifacthub.io/links: | - name: Documentation url: https://www.consul.io/docs/k8s - name: hashicorp/consul-helm url: https://github.com/hashicorp/consul-helm - name: hashicorp/consul url: https://github.com/hashicorp/consul - name: hashicorp/consul-k8s url: https://github.com/hashicorp/consul-k8s artifacthub.io/prerelease: "false" apiVersion: v2 appVersion: 1.10.0 description: Official HashiCorp Consul Chart home: https://www.consul.io icon: https://raw.githubusercontent.com/hashicorp/consul-helm/master/assets/icon.png kubeVersion: '>=1.16.0-0' name: consul sources: - https://github.com/hashicorp/consul - https://github.com/hashicorp/consul-helm - https://github.com/hashicorp/consul-k8s version: 0.32.0 -
consul (vm)
$ consul version
Consul v1.10.0
Revision 27de64da7
-
1. Kubernetes에 Consul 설치
Kubernetes에서 Consul을 실행하는 권장 방법은 Helm 차트를 사용하는 것 입니다. Consul을 실행하는 데 필요한 모든 구성 요소를 설치하고 구성합니다. Helm 2를 사용하는 경우 Helm 2 설치 가이드 에 따라 Tiller를 설치해야합니다.
1.1 helm Repository 추가
HashiCorp helm Repository를 추가합니다.
$ helm repo add hashicorp https://helm.releases.hashicorp.com
"hashicorp" has been added to your repositories
Consul 차트에 접근가능한지 확인합니다.
$ helm search repo hashicorp/consul
NAME               CHART VERSION   APP VERSION     DESCRIPTION
hashicorp/consul        0.32.0          1.10.0           Official HashiCorp Consul Chart
1.2 Gossip 프토토콜을 위한 Kubernetes Secret 생성
Kubernetes상에서 Consul Datacenter의 Gossip 프로토콜에서 사용할 키를 생성합니다. 미리 생성하여 값을 넣어도 되고, 생성시 값이 생성되도록 하여도 관계 없습니다.
$ kubectl create secret generic consul-gossip-encryption-key --from-literal=key=$(consul keygen)

--- or ---

$ consul keygen
h65lqS3w4x42KP+n4Hn9RtK84Rx7zP3WSahZSyD5i1o=
$ kubectl create secret generic consul-gossip-encryption-key --from-literal=key=h65lqS3w4x42KP+n4Hn9RtK84Rx7zP3WSahZSyD5i1o=
1.3 설치를 위한 사용자 지정 yaml 작성
Helm 차트로 설치할 때 기본 설정을 엎어쓰는 파일을 생성하여 원하는 구성으로 설치되도록 준비합니다. 각 구성에 대한 설정은 Helm Chart Configuration 를 참고합니다.
# consul.yaml
global:
  name: consul
  # 기본이미지(OSS 최신 버전)가 아닌 다른 버전의 컨테이너 이미지 또는 별도의 레지스트리를 사용하는 경우 명시합니다.
  # image: 'hashicorp/consul-enterprise:1.8.5-ent'
  datacenter: 'gs-k8s'
  tls:
    # Federation 구성을 위해서는 TLS가 반드시 활성화되어야 합니다.
    enabled: true
    verify: false
    httpsOnly: false

  federation:
    enabled: true
    # Kubernetes가 Primary Datacenter이기 때문에 이 환경에서 Federation을 위한 시크릿을 생성하도록 합니다.
    # https://www.consul.io/docs/k8s/installation/multi-cluster/kubernetes#primary-datacenter
    createFederationSecret: true
  gossipEncryption:
    # gossip프로토콜은 암호화되어야 하며, 해당 키는 미리 Kubernetes에 Secret으로 구성합니다.
    secretName: consul-gossip-encryption-key
    secretKey: key
  # enableConsulNamespaces: true
server:
  enabled: true
  # 외부 DC와의 RPC를 위한 포트 오픈 여부입니다. client에서도 Gossip 포트를 활성화하는 경우 겹칠 수 있으므로 server.ports.serflan.port 를 8301이 아닌 포트로 지정합니다.
  exposeGossipAndRPCPorts: true
  ports:
    serflan:
      port: 9301
  # enterpriseLicense:
    # secretName: consul-enterprise-license-key
    # secretKey: key
client:
  exposeGossipPorts: true
connectInject:
  enabled: true
  centralConfig:
    enabled: true
ui:
  service:
	  # UI에 접속을 위한 타입을 정의합니다.
	  # 보안상의 이유로 LoadBalancer기본적으로 서비스를 통해 노출되지 않으므로 kubectl port-forward를 사용하거나
    # NodePort로 UI에 접속하는 데 사용해야 합니다.
    type: NodePort
dns:
  enabled: true
meshGateway:
  # 메시 게이트웨이는 데이터 센터 간의 게이트웨이입니다.
  # 데이터 센터 간의 통신이 메시 게이트웨이를 통과하므로 Kubernetes에서 페더레이션을 위해 활성화되어야합니다.
  enabled: true
  service:
    type: NodePort
    nodePort: 31001

# Ingress Gateway는 Kubernets로 요청되는 주요 관문을 Consul에서 설정하고 Service Mesh기능을 활성화 합니다.
# 이번 시나리오에서는 필수 설정이 아닙니다.
ingressGateways:
  enabled: true
  gateways:
    - name: ingress-gateway
      service:
        type: NodePort
        ports:
          - port: 31000
            nodePort: 31000
1.4 Consul Helm Chart 실행
Helm3을 사용하여 사용자 구성으로 Consul을 설치하려면 다음을 실행합니다. (사용자 구성 파일 : consul.yaml)
$ helm install consul hashicorp/consul -f consul.yaml --debug
설치가 완료되고 얼마안있어 Pod를 확인해보면 다음과 같이 확인 가능합니다.
$ kubectl get pods
NAME                                                          READY   STATUS    RESTARTS   AGE
consul-connect-injector-webhook-deployment-65bd899847-z6q5v   1/1     Running   0          15h
consul-f66v2                                                  1/1     Running   0          15h
consul-hnsvg                                                  1/1     Running   0          15h
consul-ingress-gateway-848d47ffbf-86ct9                       2/2     Running   0          15h
consul-ingress-gateway-848d47ffbf-hshbn                       2/2     Running   0          15h
consul-mesh-gateway-55dd6498fb-br579                          2/2     Running   0          15h
consul-mesh-gateway-55dd6498fb-pkjc5                          2/2     Running   0          15h
consul-server-0                                               1/1     Running   0          15h
consul-server-1                                               1/1     Running   0          15h
consul-server-2                                               1/1     Running   0          15h
consul-z2z9k                                                  1/1     Running   0          15h
- consul-server: 3중화되어 구성됩니다.
- consul: Consul Client가 DaemonSet 형태로 모든 노드에 구성됩니다.
- consul-mesh-gateway: 기본 2중화 설정으로, 2개 구성됩니다.
1.5 설치 후 추가 가이드(Option)
ProxyDefaults
helm 0.30.+ 에서는 Proxy Defaults 구성을 적용해줍니다.
kubectl apply -f - <<EOF
apiVersion: consul.hashicorp.com/v1alpha1
kind: ProxyDefaults
metadata:
  name: global
spec:
  meshGateway:
    mode: local
EOF
port-forward
Consul UI에 접혹하기 위해 port-forward 를 사용하는 경우 다음과 같이 설정하여 접근가능합니다.
# HTTP
$ kubectl port-forward service/consul-server 8500:8500

# HTTPS (TLS)
$ kubectl port-forward service/consul-server 8501:8501
ACL
ACL이 활성화된 경우 ACL토큰이 필요합니다. 전체 권한이 있는 bootstrap토큰은 다음과 같이 확인할 수 있습니다. (값의 마지막 % 는 제외)
$ kubectl get secrets/consul-bootstrap-acl-token --template= | base64 -D
e7924dd1-dc3f-f644-da54-81a73ba0a178%
1.6 테스트를 위한 Pod 생성(Option)
Kubertnetes상에서 Mesh Gateway를 사용하기 위한 설정을 확인할 수 있도록 테스트를 위한 Pod를 생성합니다.
# k8s-consul-app.yaml
apiVersion: v1
kind: ServiceAccount
metadata:
  name: counting
---
apiVersion: v1
kind: Pod
metadata:
  name: counting
  annotations:
    'consul.hashicorp.com/service-tags': servicemesh, consul, counting, v1
    'consul.hashicorp.com/connect-inject': 'true'
spec:
  containers:
    - name: counting
      image: hashicorp/counting-service:0.0.2
      ports:
        - containerPort: 9001
          name: http
  serviceAccountName: counting
---
apiVersion: v1
kind: ServiceAccount
metadata:
  name: dashboard
---
apiVersion: v1
kind: Pod
metadata:
  name: dashboard
  labels:
    app: 'dashboard'
  annotations:
    'consul.hashicorp.com/service-tags': servicemesh, consul, dashiboard, v1
    'consul.hashicorp.com/connect-inject': 'true'
    'consul.hashicorp.com/connect-service-upstreams': 'counting:9001'
spec:
  containers:
    - name: dashboard
      image: hashicorp/dashboard-service:0.0.4
      ports:
        - containerPort: 9002
          name: http
      env:
        - name: COUNTING_SERVICE_URL
          value: 'http://localhost:9001'
  serviceAccountName: dashboard
---
apiVersion: 'v1'
kind: 'Service'
metadata:
  name: 'dashboard-service-nodeport'
  namespace: 'default'
  labels:
    app: 'dashboard'
spec:
  ports:
    - protocol: 'TCP'
      port: 80
      targetPort: 9002
  selector:
    app: 'dashboard'
  type: 'NodePort'
'consul.hashicorp.com/connect-inject': 'true'해당 annotations가 선언되면 consul api를 통해 해당 Pod가 배포될 때 Sidecar가 함께 생성됩니다.'consul.hashicorp.com/connect-service-upstreams': 'counting:9001'설정은 side가에 9001포트로 요청이 오면counting으로 정의된 서비스로 해당 요청을 전달합니다.- Consul 내부에서의 Service Mesh기능은 Consul의 Service Discovery 기능에 따라, Sidecar들이 서로를 찾을 수 있습니다.
- 예제의
dashboard앱은 frontend앱으로 UI를 제공하며,counting앱은 backend앱으로 호출시 내부적으로 counting을 추가합니다. - dashboard앱은 백엔드로 localhost의 9001에 요청합니다. Pod 내의 container는 동일한 ip를 갖기 때문에
upstream설정으로 9001에 대한 목적지를 알고 있는 sidecar container proxy가 해당 요청을 전달합니다.
2. BMs/VMs에 Consul 설치
BM이나 VM 환경에 Consul을 설치하는 방법은 미리 컴파일 된 바이너리를 사용하여 구성하거나 소스로부터 컴파일하여 사용하는 두가지 방법이 있습니다. 사전 컴파일 된 바이너리를 다운로드하여 사용하는 방법이 가장 쉽습니다. 이번 환경에서는 컴파일된 바이너리를 기준으로 설명합니다.
2.1 Consul 바이너리 다운로드와 PATH 설정
각 환경(Linux/Windows/Mac/FreeBSC/Solaris)에 맞는 바이너리를 받고 압축을 풉니다. consul 혹은 Windows의 경우 consul.exe를 시스템의 적절한 위치에 이동시키고 PATH에 추가시키면 어느곳에서든 접근할 수 있습니다.
2.1.1 Linux 기반 또는 Mac
쉘 설정 파일을 편집하여 PATH에 영구적으로 추가할 수 있습니다. 일반적으로 . + 쉘이름 + rc 로 구성되며 bash쉘을 사용하는 경우 ~/.bashrc 가 해당 파일입니다. 해당 파일에서 export PATH=으로 시작하는 :(콜론)으로 구분된 위치에 consul 바이너리 파일 위치를 넣어주거나 없는 경우 기존 PATH에 추가로 기입할 수 있습니다. /tools/consul_dir 디렉토리인경우 다음의 예와 같습니다.
...
export PATH=$PATH:/tools/consul_dir
root 권한이 있다면 시스템의 기본 PATH로 지정되어있는 /usr/local/bin디렉토리에 consul을 복사하는 것도 하나의 방법이 될 수 있습니다.
2.1.2 Windows
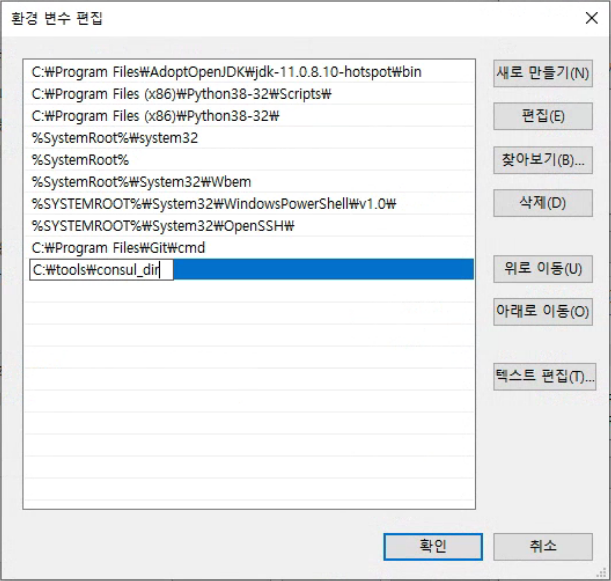
시스템 설정에서 GUI를 통해 PATH를 추가합니다. 마우스 클릭으로 진행하는 경우 Windows 설정 > 시스템 > 정보 > 시스템 정보 > 고급 시스템 설정 > 고급 탭 > 환경 변수의 단계로 진행합니다. 작업표시줄의 검색창에서 고급 시스템 설정 을 검색하여 고급 탭 > 환경변수 로 이동할 수도 있습니다. 환경 변수 GUI에서 USER 또는 시스템 변수의 Path에 Consul 디렉토리 경로를 추가합니다.
2.2 Primary 환경에서 인증서 가져오기
Federation Between VMs and Kubernetes : https://www.consul.io/docs/k8s/installation/multi-cluster/vms-and-kubernetes
Kubernetes에 구성된 Consul Datacenter가 Primary이기 때문에 해당 환경에서 TLS 인증서를 가져옵니다. 앞서 구성된 Kubernetes 환경에서 CA(Certificate authority cert)와 서명 키(Certificate Authority signing key)를 가져옵니다.
-
$ kubectl get secrets/consul-ca-cert –template=’’ base64 -D > consul-agent-ca.pem -
$ kubectl get secrets/consul-ca-key –template=’’ base64 -D > consul-agent-ca-key.pem
두 파일이 생성된 위치에서 consul tls명령을 사용하여 서버에서 사용할 인증서를 생성합니다.
$ consul tls cert create -server -dc=gs-vm -additional-dnsname=consul-server.server.gs-vm.consul
==> Using consul-agent-ca.pem and consul-agent-ca-key.pem
==> Saved gs-vm-server-consul-0.pem
==> Saved gs-vm-server-consul-0-key.pem
동일한 위치에서 Client를 위한 인증서를 생성합니다.
$ consul tls cert create -client -dc=gs-vm -additional-dnsname=consul-server.server.gs-vm.consul
==> Using consul-agent-ca.pem and consul-agent-ca-key.pem
==> Saved gs-vm-client-consul-0.pem
==> Saved gs-vm-client-consul-0-key.pem
CA 파일과 새로 생성한 파일을 Server와 Client 각 환경에 복사합니다. (e.g. /home/consul/consul-cert/gs-vm-server-consul-0.pem)
앞서 생성한 파일 이름을 기준으로 복사 대상은 다음과 같습니다.
- Server
- consul-agent-ca.pem
- gs-vm-server-consul-0.pem
- gs-vm-server-consul-0-key.pem
- Client
- consul-agent-ca.pem
- gs-vm-client-consul-0.pem
- gs-vm-client-consul-0-key.pem
2.3 Consul 구성 파일 작성
CLI를 활용하여 Consul을 구동할 때 구성 옵션을 사용하는 것도 가능하나 여기서는 구성 파일을 작성하여 Consul Server나 Consul Client가 기동할 수 있도록 합니다. Server와 Client에 대한 설정에 약간의 차이가 있을 뿐 대부분이 동일합니다.
2.3.1 Server
server = true
ui = true
bootstrap_expect = 3
node_name = "consul_server_01"
datacenter = "gs-vm"
client_addr = "0.0.0.0"
bind_addr = ""
advertise_addr_wan  = "20.194.24.41"
translate_wan_addrs = true
encrypt = "h65lqS3w4x42KP+n4Hn9RtK84Rx7zP3WSahZSyD5i1o="
data_dir = "/var/lib/consul"
retry_join = ["192.168.100.51","192.168.100.52","192.168.100.83"]
ports {
  https = 8501
  http = 8500
  grpc = 8502
}
enable_central_service_config = true
connect {
  enabled = true
  enable_mesh_gateway_wan_federation = true
}
primary_datacenter = "k8s-dc"
primary_gateways = ["172.16.1.111:31001","172.16.1.116:31001"]
cert_file = "/root/consul-cert/gs-vm-server-consul-0.pem"
key_file = "/root/consul-cert/gs-vm-server-consul-0-key.pem"
ca_file = "/root/consul-cert/consul-agent-ca.pem"
-
server : server로 구성되는 Consul의 경우에
true로 설정합니다. -
node_name, bind_addr는 각 Server에 맞게 구성합니다. 여기서는 3개의 서버로 구성하였습니다.
-
encrypt :
consul keygen을 생성한 값입니다. Server와 Client모두 동일한 값을 설정합니다. -
data_dir : Consul의 데이터를 저장할 경로이며 미리 생성해야 합니다.
-
retry_join : Consul 서버의 IP를 기입합니다.
-
ports: Mesh Gateway구성을 위해 https를 활성화 합니다.
-
enable_central_service_config : federation 구성을 위해
true로 설정합니다. -
connect : Service Mesh 구성 활성화를 위해 구성합니다.
enable_mesh_gateway_wan_federation는 Federation에서 Mesh Gateway를 활성화 시켜줍니다. -
primary_datacenter : kubernetes 환경의 Datacenter이름을 기입합니다.
-
primary_gateways : Kubernetes 환경의 Mesh Gateway 의 IP와 Port를 기입합니다. 여기 예제에서는 Nodeport로 구성된 Consul Mesh Gateway의 값이 확인됩니다.
$ kubectl exec statefulset/consul-consul-server -- sh -c 'curl -sk https://localhost:8501/v1/catalog/service/mesh-gateway | jq ".[].ServiceTaggedAddresses.wan"' { "Address": "172.16.1.111", "Port": 31001 } { "Address": "172.16.1.116", "Port": 31001 } -
cert_file / key_file / ca_file : 앞서 생성한 Server 인증서들의 경로와 파일명을 기입합니다.
2.3.2 Client
node_name = "consul_client_01"
datacenter = "gs-vm"
client_addr = "0.0.0.0"
bind_addr = "192.168.100.54"
encrypt = "h65lqS3w4x42KP+n4Hn9RtK84Rx7zP3WSahZSyD5i1o="
data_dir = "/var/lib/consul"
retry_join = ["192.168.100.51","192.168.100.52","192.168.100.53"]
cert_file = "/root/consul-cert/gs-vm-client-consul-0.pem"
key_file = "/root/consul-cert/gs-vm-client-consul-0-key.pem"
ca_file = "/root/consul-cert/consul-agent-ca.pem"
- node_name, bind_addr는 각 Client 맞게 구성합니다.
- data_dir : Consul의 데이터를 저장할 경로이며 미리 생성해야 합니다.
- retry_join : Consul 서버의 IP를 기입합니다.
- cert_file / key_file / ca_file : 앞서 생성한 Client 인증서들의 경로와 파일명을 기입합니다.
2.4 Consul 서비스 설치 (Option)
Linux 환경이나 Windows환경에서 서비스로 구성하면 시스템 부팅 시 자동으로 시작할 수 있기 때문에 선호되는 설치 방식 중 하나입니다. 이미 설치된 상태라면 앞서 구성을 변경하고 consul reload를 사용하여 구성을 다시 읽어오거나 리스타트 합니다.
2.4.1 Linux
/etc/systemd/system/consul.service에 다음의 서비스 파일을 작성합니다. 필요에 따라 User와 Group을 추가하여 구성하는 것도 가능합니다. 여기서는 consul User를 구성하여 사용하였습니다.
[Unit]
Description=Consul Service Discovery Agent
Documentation=https://www.consul.io/
After=network-online.target
Wants=network-online.target

[Service]
Type=simple
User=consul
Group=consul
ExecStart=/usr/local/bin/consul agent -config-dir=/etc/consul.d

ExecReload=/bin/kill -HUP $MAINPID
KillSignal=SIGINT
TimeoutStopSec=5
Restart=on-failure
SyslogIdentifier=consul

[Install]
WantedBy=multi-user.target
등록된 서비스를 활성화 하고 시작하여 상대를 확인합니다.
$ systemctl enable consul
$ systemctl start consul
$ systemctl status consul
● consul.service - Consul Service Discovery Agent
   Loaded: loaded (/etc/systemd/system/consul.service; enabled; vendor preset: disabled)
   Active: active (running) since 토 2020-11-14 19:05:39 UTC; 17h ago
     Docs: https://www.consul.io/
 Main PID: 1020 (consul)
   CGroup: /system.slice/consul.service
           └─1020 /usr/local/bin/consul agent -config-dir=/etc/consul.d

$ journalctl -u consul -f
11월 15 13:06:12 cl01-consul-vault-0 consul[1020]: 2020-11-15T13:06:12.265Z [INFO]  agent.server: Handled event for server in area: event=member-join server=consul-consul-server-1.tsis-k8s area=wan
11월 15 13:06:18 cl01-consul-vault-0 consul[1020]: 2020-11-15T13:06:18.119Z [INFO]  agent.server.memberlist.wan: memberlist: Suspect consul-consul-server-0.tsis-k8s has failed, no acks received
2.4.2 Windows
Powershell을 활용하여 서비스를 구성합니다.
> sc.exe create "Consul" binPath= "consul agent -config-dir=C:\ProgramData\consul\config" start= auto
[SC] CreateService SUCCESS

> sc.exe start "Consul"

SERVICE_NAME: Consul
        TYPE               : 10  WIN32_OWN_PROCESS
        STATE              : 4  RUNNING (STOPPABLE, NOT_PAUSABLE, ACCEPTS_SHUTDOWN)
        WIN32_EXIT_CODE    : 0  (0x0)
        SERVICE_EXIT_CODE  : 0  (0x0)
        CHECKPOINT         : 0x0
        WAIT_HINT          : 0x0
        PID                : 8008
        FLAGS              :
2.5 Federation 확인 (Option)
Secondary Datacenter인 BM/VM 환경에서 primary_datacenter를 지정하였기 때문에 기동 후 Kubernetes의 Consul과 Join되어 Federation이 구성됩니다.

Kubernetes 환경에서 다음과 같이 조회할 수 있습니다.
$ kubectl exec statefulset/consul-server -- consul members -wan
Node                    Address            Status  Type    Build   Protocol  DC      Segment
consul-server-0.gs-k8s  10.240.0.5:8302    alive   server  1.9.4   2         gs-k8s  <all>
consul-server-1.gs-k8s  10.240.0.4:8302    alive   server  1.9.4   2         gs-k8s  <all>
consul-server-2.gs-k8s  10.240.0.6:8302    alive   server  1.9.4   2         gs-k8s  <all>
consul-server.gs-vm     20.194.28.41:8302  alive   server  1.10.0  2         gs-vm   <all>
3. BM/VM 환경의 Mesh Gateway 구성
Mesh Gateway를 구성하여 Service Mesh 환경이 멀티/하이브리드 Datacenter 환경을 지원하도록 합니다. Mesh Gateway는 Consul의 내장 Proxy로는 동작하지 못하므로 Envoy 를 설치하여 이를 활용합니다.
3.1 Envoy 설치
Consul의 각 버전별 지원하는 Envoy 버전은 다음 표와 같습니다. (2021년 6월 26일 기준)
| Consul Version | Compatible Envoy Versions |
|---|---|
| 1.10.x | 1.18.3, 1.17.3, 1.16.4, 1.15.5 |
| 1.9.x | 1.16.4, 1.15.5, 1.14.7‡, 1.13.7‡ |
| 1.8.x | 1.14.7, 1.13.7, 1.12.7, 1.11.2 |
| 1.7.x | 1.13.7, 1.12.7, 1.11.2, 1.10.0* |
| 1.6.x, 1.5.3, 1.5.2 | 1.11.1, 1.10.0, 1.9.1, 1.8.0† |
| 1.5.1, 1.5.0 | 1.9.1, 1.8.0† |
| 1.4.x, 1.3.x | 1.9.1, 1.8.0†, 1.7.0† |
‡ 리스너의 업데이트 개선으로 Consul 1.9.0+ 의 Envoy 1.15.0+를 권장합니다.
† 1.9.1 버전 이하의 Envoy는 CVE-2019-9900, CVE-2019-9901 취약점이 보고되었습니다.
* Consul 1.7.x에서 Envoy 1.10.0을 사용하는 경우 consul connect envoy 커맨드 사용시 -envoy-version 옵션을 포함해야합니다.
Package로 설치하는 방법들도 있고, Get Envoy를 사용하여 설치하는 방법도 있습니다.
$ curl -L https://getenvoy.io/cli | sudo bash -s -- -b /usr/local/bin
$ getenvoy run standard:1.18.3 -- --version
3.2 Mesh Gateway 실행
Mesh Gateway는 TLS를 필요로하며 Consul과도 TLS로 통신 합니다. 따라서 Consul로의 기본 접속 방식과 포트를 SSL기준으로 설정하여 실행합니다. 또한 앞서 Consul Client를 위해 생성한 인증서를 활용합니다.
$ export CONSUL_HTTP_SSL=true
$ export CONSUL_HTTP_ADDR=https://127.0.0.1:8501
$ consul connect envoy -gateway=mesh -register -expose-servers \
  -service "mesh-gateway-secondary" \
  -ca-file=/root/consul-cert/consul-agent-ca.pem \
  -client-cert=/root/consul-cert/gs-vm-client-consul-0.pem \
  -client-key=/root/consul-cert/gs-vm-client-consul-0-key.pem \
  -address ':9100' \
  -wan-address ':9100' \
  -admin-bind=127.0.0.1:19001 &
- service : Consul에 등록되는 Mesh Gateway의 서비스 이름 입니다.
- : Consul에서 사용하는 템플릿 값입니다. 이렇게 작성하면 Network설정에서 해당 인터페이스에 지정된 IP를 받아올 수 있습니다. address 지정시 ‘’ 와같이 지정 가능합니다.
- admin-bind : Envoy의 관리자 바인딩을 설정합니다. 동일한 호스트에서 여러개의 Envoy를 실행하는 경우 Admin Port가 중복될 수 있습니다. 기본값은 19000 입니다.
- 백그라운드 실행을 위해 끝에
&를 붙였습니다. 원하지 않으시면 제거하여 포그라운드로 띄우셔도 됩니다.
실행 후에는 Consul UI에서도 해당 Mesh Gateway를 확인할 수 있습니다.
4. TEST (Option)
Frontend 애플리케이션을 BM/VM 환경에 구성하고 Backend를 Kubernetes에 구성하는 예제입니다.
https://github.com/hashicorp/demo-consul-101
4.1 Counting Service(Backend) on Kubernetes
앞서 1.6 테스트를 위한 Pod 생성의 counting 서비스를 활용합니다.
apiVersion: v1
kind: ServiceAccount
metadata:
  name: counting
---
apiVersion: v1
kind: Pod
metadata:
  name: counting
  annotations:
    'consul.hashicorp.com/service-tags': servicemesh, consul, counting, v1
    'consul.hashicorp.com/connect-inject': 'true'
spec:
  containers:
    - name: counting
      image: hashicorp/counting-service:0.0.2
      ports:
        - containerPort: 9001
          name: http
  serviceAccountName: counting
4.2 DashBoard Service(Frontend) on BM/VM
BM/VM 환경에서 Frontend 애플리케이션을 구성합니다. Envoy Proxy를 Sidecar로 구성하여 Service Mesh를 위한 구성을 하고, 다른 Consul 데이터센터에 있는 서비스를 찾을 수 있도록 합니다.
https://github.com/hashicorp/demo-consul-101/tree/master/services/dashboard-service
애플리케이션 실행을 위해서는 golang이 설치되어야 합니다.
Dashboard 애플리케이션을 실행합니다.
$ PORT=9003 COUNTING_SERVICE_URL="http://localhost:5000" go run main.go &
- PORT : Dashboard 애플리케이션에서 사용하는 포트를 정의합니다.
- COUNTING_SERVICE_URL : Backend 애플리케이션인 Counting Service에 대한 정보입니다. 없는 경우 기본 값은 “http://localhost:9001” 입니다.
9003으로 실행된 Dashboard 애플리케이션을 Consul에 서비스로 등록합니다. Consul의 기본 Configuration 디렉토리 위치에 해당 서비스 구성을 작성하고 읽어올 수 있습니다. (e.g. /etc/consul.d)
# /etc/consul.d/dashboard.hcl
service {
  name = "dashboard-vm"
  port = 9003

  connect {
    sidecar_service {
      proxy {
        upstreams = [
          {
            destination_name = "counting"
            datacenter = "k8s-dc"
            local_bind_port = 5000
            mesh_gateway {
              mode = "local"
            }
          }
        ]
      }
    }
  }

  check {
    id       = "dashboard-check"
    http     = "http://localhost:9003/health"
    method   = "GET"
    interval = "1s"
    timeout  = "1s"
  }
}
- connect에 Service Mesh 설정을 추가합니다.
- destination_name : local_bind_port로 오는 요청을 어떤 서비스로 보낼지 정의합니다.
- datacenter : 데이터센터 이름이 해당 서비스가 속한 데이터센터 이름과 다르면 외부 Mesh Gateway를 찾고, Federation 된 해당 Mesh Gateway로 요청을 전송합니다.
Dashboard 애플리케이션에서 COUNTING_SERVICE_URL의 대상을 5000번 포트로 지정하였기 때문에 upstream에서 바인딩되는 포트를 맞춰줍니다. 구성이 완료되면 consul reload 명령을 통해 구성 디렉토리의 파일을 반영하고 추가된 서비스를 확인합니다.
$ consul reload
Configuration reload triggered

$ consul catalog services
consul
dashboard-vm
다음으로 Dashboard 서비스를 위한 Sidecar를 실행하고 추가된 서비스를 확인합니다.
$ consul connect envoy -sidecar-for dashboard-vm \
  -ca-file=/root/consul-cert/consul-agent-ca.pem \
  -client-cert=/root/consul-cert/gs-vm-client-consul-0.pem \
  -client-key=/root/consul-cert/gs-vm-client-consul-0-key.pem &

$ consul catalog services
consul
dashboard-vm
dashboard-vm-sidecar-proxy
이제 구성된 9003번 포트를 통해 Frontend에서 외부 데이터센터의 Backend로 요청이 되는지 확인합니다.

4.3 Intention
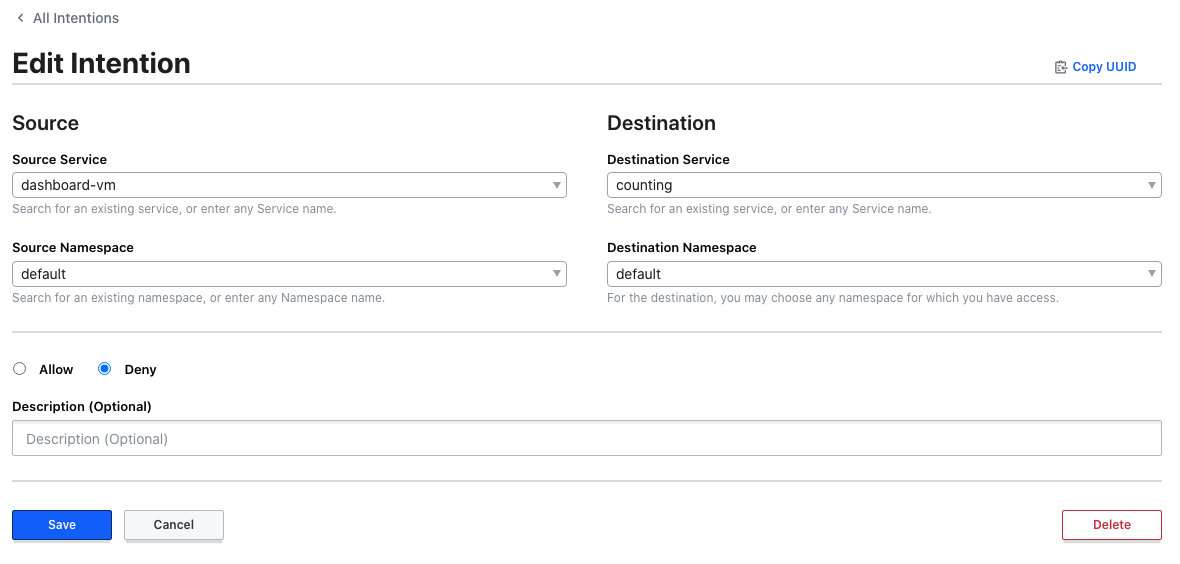
Sidecar기능이 활성화 되면서 Consul의 Intention기능을 사용할 수 있습니다. Intention을 통해 동적으로 서비스에 대한 트래픽을 통제할 수 있습니다.
UI 또는 CLI를 통해 dashboard-vm이 counting에 접근할 수 없도록 정의합니다.
$ consul intention create -deny -replace dashboard-vm counting
Created: dashboard-vm => counting (deny)
접근할 수 없게 설정되었기 때문에 Sidecar에 주입된 설정으로 Dashboard에서는 Counting서비스에 접근할 수 없다는 메시지를 출력합니다.

Comments